Monday, December 13, 2010

Hidden Safari


For this project we started with an 8 X 10 sheet of white paper. Using a light blue colored pencil we drew a picture of an animal, however we were required to draw it upside down. The purpose of this was to focus on the lines, not the image. After completing the drawing, using warm colored crayons (red, orange, yellow, pink) you cover up the drawing with patterns. Once this was done we created a special pair of glasses using red cellophane. When you wear the glasses you can see the hidden picture.
Extension Activity:
For this activity I would incorporate it into history while discussing code breakers in war time. Instead of drawing a picture you can write a message or create your own secrete code using symbols.

Starry Night Tissue Collage

This was the second project we did using the techniques of Vincent Van Gogh. We used a sheet of black construction paper and applied cut out shapes of tissue paper to it. After applying the tissue paper a clear sealant was applied to cover the entire paper. A cityscape was cut out of black construction paper and glued to the collage. Oil pastels were used to add details to the project.

Extension Activity:
An activity I would like to try would be to create a background (two I’m thinking of are an underwater scene or a prairie scene) using a tissue paper collage. Then using construction paper, you would cut out items that go with the background scene (such as fish, eels, sharks, etc. for the underwater scene and buffalo, deer, rabbits, wagon trains, etc. for the prairie scene.)

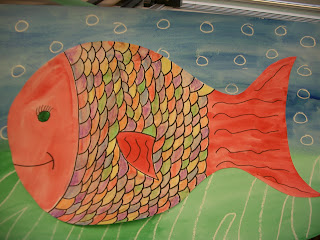
Peer Lesson: Rainbow Fish Watercolors


This project was done in two steps. The first step was to create the background. We were told to either use warm or cool colors, but whatever we picked the fish had to be the opposite. For my project I chose to use cool colors for the background. I used a white crayon to make the paper with bubbles and seaweed so when I painted over them you could see them. For the second step we were given a blank cutout of the fish to decorate. I chose to do scales on my and then I colored them with watercolor crayons and light brushed over them with water to blend them. The face, tail and fin were done with regular watercolors. I specifically chose to make the scales rainbow colors based on the project name and I chose red watercolor because I thought it contrasted well against the blue and green background.
Extension Activity:
I think a fun extension activity for this project would be to use colored goldfish crackers to help teach math and colored patterns. You can also use this to help teach young children about sharing.

Peer Lesson: Textured Painting


For this project students were exposed to several objects that produce texture such as pinecones, sponges, carpet, tinsel, bubble wrap, etc. Students were given the primary colors of paint for this project. The requirements for this project were as follows: 1) students could create a picture using a pattern format. 2) Students could create a picture using their name. 3) Students could create a picture using shapes and 4) students could create an abstract painting of their own as long as it meets all the requirements. 5) Students had to use a minimum of four colors (2 primaries, 1 secondary and 1 intermediate). 6) A minimum of three textures needed to be used and 7) Students were encouraged to use the whole paper while maintaining balance.
Extension Activity:
I would incorporate this into a history lesson about the printing press. How did the printing come about, early attempts with printing and how it changed the world.

Peer Lesson: Oil Pastels creating Background, Middle Ground and Foreground


For this project we were to design our own snow globes. We used oil pastels and we were to incorporate a background, a middle ground and a foreground. We were allowed to create any scene we wanted as long as we followed the requirements. We were encouraged to blend the colors and incorporate elements and principles of design. I chose to use the mountains and the sky as my background. The smaller trees were my middle ground and the cabin and the large tree were my foreground. I used color, shape, lines, and balance as my elements and on my cabin I created texture.
Extension Activity:
I think this is just a fun activity that can be used at any time or holiday. Creating a snow globe, a thanksgiving scene, a Halloween scene or an Easter scene can easily be accomplished. I would just have the students focus on the elements and principles of design and continue to give them opportunities to practice.

Peer Lesson: Monochromatic Painting


For this project we were asked to pick a shape. We were to draw a minimum of eight shapes overlapping on the paper. Then we were to pick one color of paint along with black and white. We were to paint the shapes using our starter color and creating tints and shades using the white and black paint. I chose to use triangles for my project because when they overlap the create diamonds. I chose green as my starter color because it is my favorite. I used three tints and three shades and I tried to keep everything balanced.
Extension Activity:
With this project I would try to infuse it into a math lesson focusing on shapes. For the younger children you can help them make shape puzzles. For the older children you can start by having them measure shapes and obviously progress into geometry.

Peer Lesson: Pinch Pots

We were given a brief history about what clay is and how it is used. New vocabulary was introduced. We were given a blob of clay that we were to use to make pinch pots out of. First we had to work the clay to make sure there were no bubbles in it. Then we worked the clay into a ball and using our thumbs we pushed down in the middle and worked our way around the entire ball creating a pot. All steps were modeled by the teachers and they continuously checked for understanding. We were required to have certain elements such as scoring in our project.

Extension Activity:
I would like to incorporate this activity into a thematic unit on Egypt. Egyptians were some of the first people to use clay pots. I would have to put a lot of thought into the planning of the unit, but I think there are endless possibilities here.

Eric Carle Collage

This project was based off of Eric Carle’s book The Very Hungry Caterpillar. The first thing we did was to create sheets of painted paper using various colors. This was done by using equal amounts of paint and wallpaper paste to give it a sort of translucent look. Then designs were made in the paint. While those were drying the next step was to create a two page story concept. We could do something from The Very Hungry Caterpillar or choose something of our own. I chose to do a storyboard about a ladybug that is different than other ladybugs. Once you have your story idea you use the painted sheets of paper to cut out your objects. Once you have everything cut out, choose a large piece of construction paper. Apply the painted objects and create a two page story collage on the construction paper. My first page shows a black ladybug with yellow spots sitting on a leaf all alone. The second page shows the lonely ladybug surrounded by four other ladybugs. They don’t care what he looks like and from that day on he is never alone.

Extension Activity:
You can pretty much use this project with any story you chose to read or have the students illustrate a story they wrote. For younger children be very specific about a particular scene from the book for them to focus on. For older children allow them to choose a scene and give them the creativity to interpret the scene as they see it. Depending on the time and supplies you can do this project the way we did it, you can use just construction paper or you can use crayons and markers. I personally like the way we did it because of the translucent effect and the designs in the paint, it gives it a textured look.

Starry Night Finger Painting

The goal of this project was to replicate Vincent Van Gogh’s famous painting “Starry Night”, although we were allowed to add elements of our own. We were given only the primary colors and black and white paint to work with. All colors had to be mixed on the paper.

Extension Activity:
I think I would like to do this project with fifth or sixth graders, but I would love to infuse this with language arts. Each student would pick a painter and one of their paintings they like. The students will write a one page informative essay about the painter and the painting they chose. The finger painting will be done on bigger paper as it is easier to work with, however pictures will be taken of each students art work and a book will be comprised of each students painting (digital photos) and their informative essay.

Thursday, October 14, 2010

Elements and Principles of Art


The first picture represents the principle of Pattern. The second picture represent the element of Texture.

Welcome to My Art Studio

All About Me Footprint

This project was designed as a tool to get to know your students. Each item on the footprint represents your student and who they are. For instance, the picture above is my footprint I designed. I chose green for my background because green in my favorite color. The dog represents my love for dogs, the peace symbol represents how I like to live my life. I also included pictures of my family and in the middle of these pictures is the name JACK, which happens to be an acronym for my family: Jacob, Austin, Corey and Kelly. In doing this project a minimum of three mediums were used. This is a great way for you to get to know your students and for them to have fun. A great extension activity that I would like to do using this same premise would be in social studies. When I think of footprints, I think of traveling. You can have your students create footprints of the different places you learn about.